Yin Bakes

I bake. I snap. I eat. I write.

Tag: asian

Pineapple Tarts (Again!)

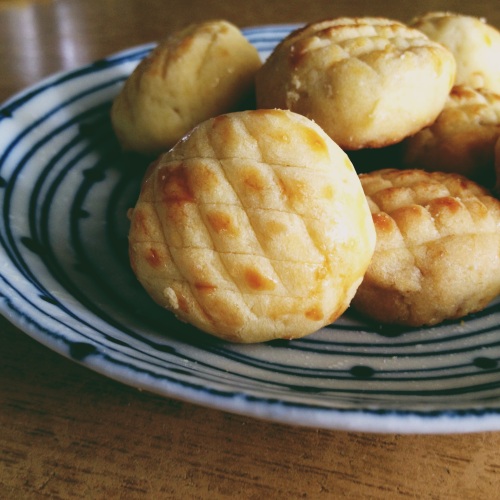
I had to make some pineapple tarts again. I just had to, since pineapples are cheap and plenty now (yay!) and there are no more pineapple tarts left to snack on in the house (boo!). So here I am, baking more tarts in the kitchen. This time, I decided to ditch the pineapple roll pastry press for my bare hands and shaping them into little balls instead for these babies.

Pineapple Tarts

My pineapples were overripe because I left them on the kitchen counter for too long. I didn’t add any sugar into my pineapple paste because it was so sweet on its own. Such a healthy fix, don’t you think? Hah! Who am I kidding? These babies were never meant to be healthy snacks.

Pineapple Tarts

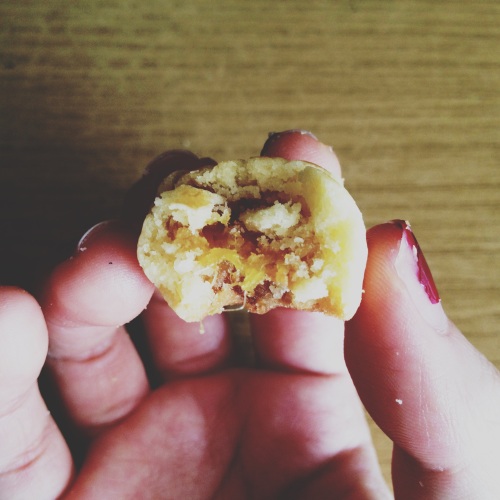
I’ve never made the enclosed version of pineapple tarts, so here goes my maiden attempt at it. This recipe contains cream cheese and cream. Weird ingredients for pastry dough, I know. But trust me, they turned out so perfect I could almost cry! The pastry is not very fragile like the ones made of cornstarch, but they melt in your mouth oh-so well. They’re so creamy, highly fragrant and tasty… oh yum! I’m in love with them. I never really like enclosed tarts but these are really good. Even my family of picky eaters couldn’t agree more. This recipe’s a keeper for sure!

Pineapple Tarts (adapted from Table For 2… Or More)

Ingredients:

  • 250 grams unsalted butter
  • 170 grams cream (I used whipping cream)
  • 75 grams castor sugar
  • 400 grams cake flour
  • 30 grams cornstarch
  • 50 grams cream cheese
  • 3 egg yolks
  • 1 egg yolk for egg wash
  • Pineapple jam (see here)

Method:

1. Preheat the oven to 170°C and line a baking tray with grease-proof paper. Meanwhile, sift cake flour and cornstarch.

2. Using a cake mixer, cream the butter, cream cheese and sugar. When it comes together, pour in cream and whip them up on medium speed for about 10 minutes. Scrape the sides from time to time, beating them until you get a creamy mixture (they’ll look lumpy at first but don’t worry!).

3. Add in 3 egg yolks and beat for about 1 minute.

4. Add half of the flour mixture into the cream mixture and mix them on low speed until they come together. Add in the remaining flour and continue beating until you get a smooth dough. Do not over-mix.

5. Allow the dough to rest for 10 minutes so that it is more manageable when shaping. Chilling it in the refrigerator helps too.

6. In the meantime, shape the pineapple filling into small balls and keep them chilled afterwards.

7. Divide the dough into small balls roughly twice the size of the rolled pineapple fillings.

8. Wrap the pineapple fillings into the dough balls. Clean your hands from time to time as the jam will make your hands sticky and wet, making dough-shaping difficult.

9. Place the finished tarts on the prepared baking tray and brush them with egg wash.

10. Bake them for 15 minutes. Turn the baking tray 180° and continue to bake for 2 more minutes or until they turn golden brown. Leave to cool before storing.

Pineapple Tarts

I am submitting this post to Chinese New Year Delights 2013 hosted by Sonia aka Nasi Lemak Lover. This post is also linked to the event, Little Thumbs Up organised by Doreen from My Little Favourite DIY and Bake For Happy Kids. The theme of this month is ‘Pineapple’! Join in the fun if you bake or cook anything with pineapple this month!

Pineapple Tarts

Pineapple tarts are my favourite new year treat. Just thinking about them makes my mouth water. These bite-size treats are so popular that they are sold in many variations: the closed, open-face or rolled (Nastar) types. Heck, I just found out about a certain Taiwanese version of this snack. They are more like shortbreads and contain a slightly different filling, but let’s not go to that now. I prefer the rolled or Nastar variation. They are very addictive. I baked a few trays of these and they were all finished in a day, no joke. They are crumbly, buttery and filled with a decadent filling. What’s not to love about them?

First, you need to make some pineapple jam or paste. I find commercially sold ones lack the tangy, sour taste of pineapples and that they are loaded with too much sugar or glucose syrup. While you can buy ready-made pineapple paste in stores, nothing beats having freshly made jam at home. Cooking your own jam is simple but tedious and time-consuming. You have to be prepared to stand over a warm stove for about an hour or more. If you have the luxury of time, jam-making is so rewarding. Just because you get to eat the remains of jam in the pot at the end (ha!).

I like grating my pineapples, for the texture. You will get really fibrous, chewy jam if you grate them. But if you’re lazy or are pressed for time (because grating them by hand takes up a lot of time) and want an easy way out, you can blend them in a food processor or a blender, though I highly recommend that you grate them. Takes a while, but it will be so worth it. I prefer mine without any additional spices (cinnamon sticks and cloves). Just pure, pineapple goodness.

Pineapple Jam (adapted from My Cooking Hut)

Ingredients:

2 half-ripe pineapples, grated
80 grams granulated sugar (adjust according to your preference)

Method:

1. Skin the pineapple and remove the “eyes”. Cut each pineapple into quarters lengthwise. Grate the pineapple using a grater until you reach the core. You may choose to wear plastic gloves to protect your hands from the acidity of the pineapples. Discard the core.

2. Drain the grated pineapples using a large sieve. Use a ladle to press the juice out until it is 90% dried up. Retain the pineapple juice for cooking later. Use a wooden spoon, cook the grated and drained pineapples, putting in half portion of the sugar in a large pot under moderate-high heat until it begins to boil. Once it has boiled, reduce the heat to medium and continue to cook, stirring occasionally to not allow it to burn.

3. Start adding the pineapple juice to the pot a ladle at a time until all the juice have been boiled away. The juice will start to evaporate and dry out. Repeat this step until all the juice are completely used up.

4. When all the juice are used up and the mixture has started to look dry and caramelized, reduce the heat to low. Add the remaining sugar bit by bit until the desired sweetness is achieved. This step can be done close to the end of the cooking. Keep stirring until the mixture is almost dry and sticky with a golden-hue. This will take about 1-1½ hours, depending on the amount you make and the surface area of the pot you use.

5. Take note that the jam will continue to thicken after it is cooled so it is best not to overcook the mixture. It is better to undercook it for you can always put it back on the heat if it is still not at the right consistency.

6. Set the pineapple jam aside to cool. After it has been cooled, store it in an air-tight container in the refrigerator. It can be kept for up to 3-4 weeks.

It is advisable that you prepare the pineapple jam a day before as it takes about an hour or more to cook and a few more hours to cool it. If you decided to hand-grate your pineapples, that will take up a whole chunk of your day too. Once the jam is done, you can proceed with making the pastry. I like my pastry to have that melt-in-the-mouth and crumbly feeling. Oh-so yummy. It complements the jam really well, and makes you just want to reach out for another piece. And another. And another. Oh, what a vicious cycle!

Pineapple Tarts (adapted from My Cooking Hut)

Ingredients:

250 grams unsalted butter, softened
50 grams icing sugar
2 egg yolks
360 grams plain flour mixed with 2 tbsp corn flour (sifted)
¼ teaspoon salt
Pineapple filling (take 6 g or ½ teaspoon heapful of filling and shape into a small elongated roll)
1 egg for egg wash

Method:

1. Preheat the oven to 160°C and line a baking tray with grease-proof paper. Meanwhile, cream the butter and the icing sugar until light. Beat in egg yolks, one at a time. Add in salt and beat until fluffy.

2. Fold in sifted ingredients (divided into 2-3 batches) and mix till it becomes a firm dough. Leave aside for 30 minutes. Put the dough into a pineapple roll pastry press or mould, and then press out into a strip of 5 cm length.

3. Place the pineapple filing at one end and roll up the pastry, as in a Swiss roll, enough to enclose the jam. Do not overlap the pastry. Cut off the excess pastry. Put the rolls on the baking tray. Brush with egg wash. Repeat the process with the remaining dough and jam.

4. Bake them for 15 minutes. Turn the baking tray 180° and continue to bake for 2 more minutes or until they turn golden brown. Leave to cool before storing.

I am submitting this post to Chinese New Year Delights 2013 hosted by Sonia aka Nasi Lemak Lover. This post is also linked to the event, Little Thumbs Up organised by Doreen from My Little Favourite DIY and Bake For Happy Kids. The theme of this month is ‘Pineapple’! Join in the fun if you bake or cook anything with pineapple this month!
Peanut Cookies

Time really flies, doesn’t it? It is now the beginning of February, and Chinese New Year is just around the corner. Isn’t it exciting? It is one of my favourite time of the year. The long holidays, red packets, new clothes, home decorations, lively Chinese music, family reunions, and more importantly… the food. Lots of it. The celebrations are never complete without the vast array of baked goodies and auspiciously named dishes, which can only mean that it is a time to put all diet plans aside, gorge ourselves silly and be merry. I got so caught up with the festivities mood that I had succumbed to baking some new year treats for my family this year.

These cookies are my father’s favourite and a must-have come every Chinese New Year. I had baked dozens of batches of these cookies and they always turned out great! These cookies will melt in your mouth, literally. It has a really fine and crumbly texture, thanks to the finely-ground peanuts and icing sugar. Oh-so yummy. Bake these and you’ll never regret it. You really can’t go wrong with peanuts, trust me.

Just to warn you though, the preparations for these cookies are pretty laborious due to the fact that you have to toast some raw peanuts first, then painstakingly remove their skins, and lastly grind them up in a blender or a food processor. Thank god I have my mom to help me out with those. Or else, they would take me forever before I even get started on making them. And in this tropical heat, standing over a wok stirring peanuts till they are fragrant is an absolutely horror.

Peanut Cookies

Preparations:

1. Roast 400 grams of raw peanuts in a dry wok (or roast them in an oven at 180°C) till they become fragrant.

2. Cool the roasted peanuts and remove the skins.

3. Grind 350 grams of peanuts in a blender or a food processor till they are finely ground.

4. Split the remaining whole peanuts in half and set them aside.

5. Line your baking tray with baking paper and preheat the oven to 180°C.

Ingredients:

  • 300 grams finely-ground peanuts
  • 300 grams all-purpose flour
  • 80 grams icing sugar
  • Corn or vegetable oil
  • Peanut halves
  • 1 egg (beaten for egg wash)

Method:

1. In a bowl, add the peanuts, flour and icing sugar. Mix them all together till they are well combined.

2. Add in the oil gradually till they form a dough. The dough is ready once it can be rolled into a ball and does not stick to your hands. If the dough is too wet and sticky, mix in additional flour. If it is too dry and crumbly, mix in more oil.

3. Divide and roll the dough into small balls and place on the baking tray. Repeat until the baking tray is filled with dough.

4. Place peanut halves at the centre of each dough balls and press them down lightly to make them stick.

5. Brush the surface of the dough balls with egg wash.

6. Bake them at 180°C for 15-20 minutes, or until they look golden brown.

7. Remove the cookies from the oven and let them sit on the baking tray for 5 minutes or so to set them (because they can be very crumbly fresh out of the oven). Then, transfer them to a wire rack for cooling. Keep cookies in an airtight container after they have cooled down completely.

These cookies are not very healthy, obviously. Oh well, there’s always the guilt trip to the gym after the celebrations. In the meantime, I shall just keep munching on these. So. Darn. Addictive. Om nom nom.

I am submitting this post to Chinese New Year Delights 2013 hosted by Sonia aka Nasi Lemak Lover.